Showing posts with label DIY. Show all posts

Thursday, May 09, 2013

DIY: Mr Men and Little Miss bracelet

I realized it is always hard find funky accessories for Harajuku style in Singapore, otherwise they are expensive. But earlier when I saw this colorful hello kitty bracelet from Forever 21, an idea strikes me!

⋙ Cute right cute right?! I think if I see it and not expensive, I'll buy it but I think by now should be OOS. (。•́︿•̀。)

Back to main point, this DIY is actually for those who used to casually collect gachapon toys. Like me! Hahahaha I believe there is like a box of them left abandoned aside and don't know what to do with them. Actually it's either too cute till can't bear to use them or because they are keychains/handphone straps that have nowhere to tangle on. But now, you can make them into superrrr cute and funky bracelets that no one else has! Like you have just bought something from Harajuku or Hongdae. Hahahaha.


⋙ Out of my collections, I chose these!
Actually they are freebies I got from 7-Eleven years ago.

Basically, you just remove all the keychain hooks or handphone straps away and then hook them to a bracelet chain. I would recommend something thinner so that your little cuties can be on focus.


⋙ Ta-dah! My final piece! Super cute right?! I love the vibrant colors too!


⋙ This is how it looks for mine.


How chunky the bracelet looks like depends on the size and amount of keychains you used. Like mine is already big in size, so they look more chunky. But don't put too little pendants, cause you won't want it to look like the typical bracelets. You know those bracelets with a few bracelets hanging along the chain? 


⋙ Another tip is to have the pendants closely hanged next to one another, then they will all look closely packed together while worn instead of tangling here and there like normal bracelets.

If you don't have so many gachapon toys, you can go and find those super cheap keychains. They may look fugly individually but I believe they will look cute as a bunch of toys hanging around your wrist.

For accessories spare parts, you can head down to Chinatown to get them. They are cheap to get. Just to share, I personally like to visit this shop for spare parts cause their stuffs are forever buy 1 get 1 free and there's so many choices to pick for accessories DIY:

LG Beads Mart
People's Park Centre
#01-43

Have fun!
☆・*:・゚d(*^∀^*)ノ ・*:・゚☆


Friday, February 04, 2011

Tutorial: Edit 1000 photos at 1 shot !

(Edited: Works on CS4 as well !)

YES ! YES ! YOU CAN ! I CAN ! WE CAN ! As long as it's on CS4/5 Photoshop platform ! ^艸^ But to edit 1000 photos at one shot , should be able to but i'm just afraid it may end up lagging !

Actually i was taught this in school and i thought this is rather an awesome thing to know especially for people like me who likes to share photos . And before sharing , i always need to do some editing , like adjusting the colors or adjust the size to make uploading to host easier . But the problem is TOO MANY PHOTOS TO EDIT ! Agree much ?

So people , OPEN UP YOUR CS4/5 PHOTOSHOP NOW ! I'M GONNA TEACH YOU HOW !

1 ☆ Open up ' ACTIONS ' window (Window > Actions) .

* This is the key thing to do such awesome shortcut


2 ☆ Click the folder button . If you don't know which , look at the image below !


3 ☆ Name your action ! Just name anything as long as you can recognize this name for the actions you gonna be doing for later on .

4 ☆ Open up one of the photos you want to edit .

5 ☆ Click on ' Create new action ' button ! If you don't know which , look at the image below !


6 ☆ Name the Action either to easy display what you are going to do on the photo or anyhow name as long as you can recognize this name for the actions you gonna be doing for later on .

7 ☆ As you know when you click ' Record ' , it means it will do something right ? YES ! The moment you click ' Record ' , it will record down ALL THE STEPS that you do on that particular photo ! But keep in mind that you are going to apply this whole recording on your 1000000 photos , so don't happily edit what color adjusting , color balance , add this and that here and there etc ... and end up it only work well for that particular photo . Defeat purpose already !

This action is actually to help you mass edit if you are going to repeat the same step(s) 1000 times on the 1000 photos . And also , better not to make mistakes while recording . Be sure what you gonna do before recording .

8 ☆ After you have completed , SAVE THE PHOTO ! It will be better if you create a new folder where all the other photos can land into it too . For now , let's say the photo is being saved inside ' edited ' folder !

9 ☆ Remember to CLOSE the photo file after saving . You won't want to have all the 1000 photos being opened on Photoshop after being edited . it will crash your Photoshop and labtop !

10 ☆ Don't forget you are still on recording mode ! Hence , after closing the file , click the ' Stop ' button to end the whole action .


11 ☆ You can test if your action works by opening a new photo and plays it . Click on the ' Play ' button to play the steps on the new photo . Check ' edited ' folder if the new photo is edited and being saved into it .

So for the next 998 photos , you have to open one by one and click ' Play ' on each of them ! That's the shortcut !


HAHAHAHA ! OKAY ! I'M JOKING ! But you can actually use this ' Play ' method if you have only few photos to work on . Like maybe 5 ?

But what if really got 1000 photos to work on ?

12 ☆ Click on ' Br ' ! (Refer to image below) Or bascially open up Adobe Bridge !


13 ☆ Select your 1000 photos or 998 if you don't want the software to work on that first 2 photos anymore .


14 ☆ Still selecting the photos , click Tools > Photoshop > Batch...


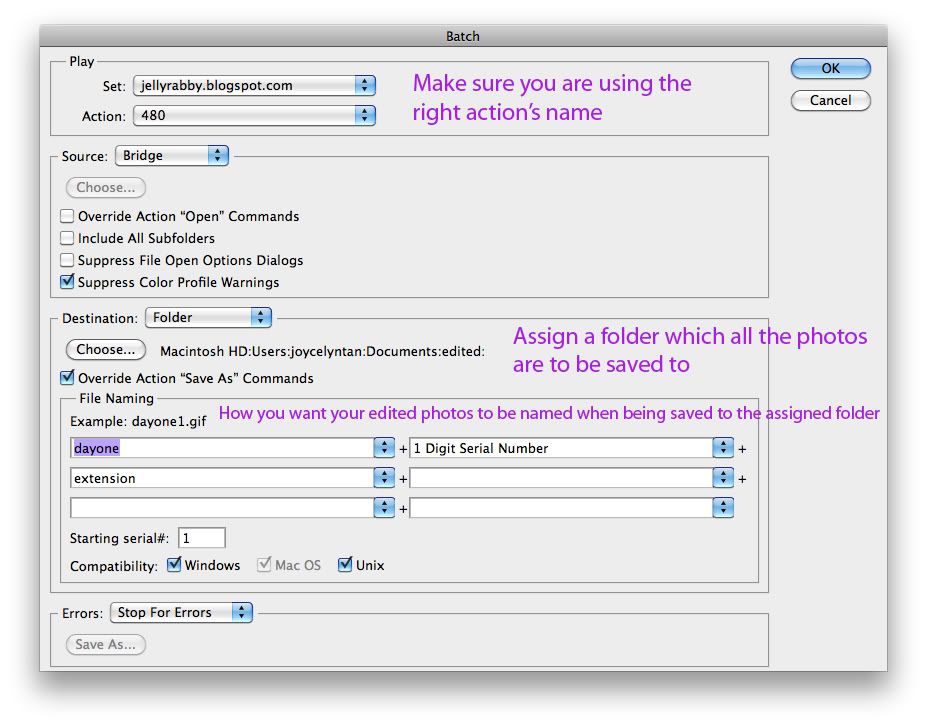
15 ☆ Follow the steps in the image below . If you can't read the text , click on it for a larger view . For the assigned folder , you can use the one you have created previously with that first 2 photos or create a new one .

Confirm and click ' OK ' !

Ta-dah ! You are done ! Just sit back and relax while watching your photos being processed ! When everything ended , just check to make sure the edited 1000/998 photos are in your assigned folder .

Easy ? i hope this is useful for whoever is reading this especially if you have taken 1000 or even 10000 photos during this CNY festive season with your family and friends !

Last but not least ,

HAPPY RABBY YEAR !!!

Thursday, December 09, 2010

Simple desk storage holder

i know everyone hates messy table . Things laying everywhere , such a messy scene ! Me no like too ! But it's really hard to find a cheap and chio storage holder . Cheap ones are fugly ; chio ones costs a bomb ! FOL !

it was till i chanced upon this photo in tumblr yesterday which inspired me :


Aiya ! i know it's the pink that i hate but who cares ! i got inspired by the holder on the most left and i started to diy something similar last night .


❝ CHEAP & CHIO & ENVIRONMENTAL FRIENDLY ! ❞

For the first time i'm gonna share diy tutorial . Honestly , i was actually thinking of updating this in my CPJ ! FML ! So i just grabbed my iphone 4 to snap the shots . BLAME IPHONE4 CAMERA IF YOU FIND THE PHOTO QUALITY SUCKY !

★ Materials Needed
⑴ 2 snack/recycled/unwanted boxes
⑵ Glue + CHEAP Paint Brush
⑶ Double-sided tape / Scotch-tape *OPTIONAL
⑷ Cloth & any other decorating materials

Before i start , this is the glue i'm gonna use :

• Dries slower compared to the normal uhu
• Able to make further adjustment even after sticking
• Less mess

TIP : Use the cheap paint brush to apply glue ! More evenly spread !


▲ This is when you can choose to use double-sided tape OR scotch tape after gluing to to stable the piece .


▲ Use scotch tape to tape the 2 sides , so that the 3 pieces stay together well .


▲ Bigger the cloth means you can wrap the inside too . And you can ignore the edges as it will be hidden inside unless the threads come off badly , you can trying folding in .

▲ Chio and cheap cloth can be found in Chinatown (2nd level of the hawker centre) for less than 10 bucks !


▲ Chio decorating materials can be found 2 bucks at Daiso ! The lace used was gotten from Daiso ! ♡

If you think the holder you have done is too big , you can get storage divider from Daiso ! Two bucks cheap cheap ! ⤵⤵⤵

(Ignore my fugly hand , thank you !)
❝ You can break to the desired length you want but cannot regret . Even when you said "aiya ! short of two more bars !" , there is no way back unless you break from the leftover again ! ❞

AND YOU ARE DONE ! MONEY SAVED !!! & SOMEMORE LOOKS LIKE THE WAY YOU LIKE/WANT !

Hope you like this tutorial !
And friends , don't ask me to do one for you ! ME LAZY LA !!! ≧艸≦

P.S. : Feel free to ask me if you are in doubt !


じゃね〜 ♡

Saturday, July 10, 2010

Inspiration through Kera (August)


▲ Deco-den bow - CUTE & CREATIVE ! i may try this out one day .


▲ There's shop(s) in Yahoo! Taiwan selling something similar to this but smaller bow . However , this can still be DIY-ed easily .

★★★ Fashion has eye(s) :


▲ Cute right ? hehehehe .

 P.S. Magazine is downloaded from here . 〕

Monday, June 07, 2010

Rocker Toot & Gib Wob

Yo peoples ! Let me introduce two new friends to you !

Rocker Toot & Gib Wob !


Yea , they are my new DIY (long necklaces) .
Aren't they cute ? ·*ㄟ(⌒∀⌒ミ)

Monday, May 31, 2010

Suspender's simple diy


i dont know what strike my head but i just wanna a suspender . But to make it unique and cooler , i poked two big studs on a strap . i didnt poked another two on another strap cause i thought it will look rather toot .

Adding studs isnt the only way to customize suspender . You can add iron-on badges , pin badges , glitters , laces ... whatever material(s) is possible . Be creative ! く(°∀°)っ

Friday, May 28, 2010

Bunny ears and big rock bow

i've been wanting to do a noticeboard/bulletin board (whatever you call it) to paste all my post-its and important stuffs that i dont wanna lose . If i just buy a bulletin board from Daiso , it will sure look damn boring and typical . And then , i got inspired by this blogger .

i already had my materials for quite some time but was rather lazy to start , and finally last night i got my ass out of the chair , away from my labtop and started diy-ing .


↑↑ Still in process but board for post-its is done .

And finally ...


↑↑ Top part (ears) for clipping papers while the bottom (bow) for slapping post-its on .

Note: If arrangement is the other way round (clipping papers on the bottom area while post-its on the top) , big papers will crash on to the cabinet unless the board is hung on the wall with sufficient space below . Since post-its are always small , it is best to have the section on the bottom area .

Last but not least , here's another DIY i've done quite some time back ↓↓


Yea , a tissue box cover ! (^ ∀ ^)ノ

Saturday, March 27, 2010

Bow or Deco

こんばんは! i'm a zombie once again . Nothing's entertaining me , so once again i'm back with my DIY-ing (last night) .

After shelving my whip cream deco set for quite some time , i finally dug out time and soul to work this awesome thing out .

超可愛いですか。But the whole result costs a life !!! Freaky expensive !!! As i squeezes the tube of cream out → heartbroken ! After maybe 2-3 usages , i'll have to get a new tube . Not forgetting , those little "made-of-gold" cuties . *淚*

Anyway , this ↑↑↑ is my first deco-den attepmt !

♥♡ More DIYs by me ♡♥:

* Sizes are not to scale *

Of course these arent done over a night . Like so crazy if i did ! Now that i have more spare time , i'm trying to do more . Always wanted to do more and sell but this idea keeps failing . *嘆声*

Will you buy if i sell these bows ?

Tuesday, February 23, 2010

Zombie alive again


it's still the get-more-angbao-season !

i dont wanna see an end in this festive season !


Steamboat at Wenjing's house !


AND AND AND !!!

I NO LONGER NEED TO WAKE UP FREAKY EARLY !!!

ITP ended !
No more classes !
Almost done with Polytechnic !


★★ On the last day of internship 之 3 shots capturing unknowingly when . ☆☆


i'm left with Graduation Show !


Celebrated Monica's birthday yesterday . And we chalet from Sunday to Monday without sleep . No night cycling too ! Gossiped from i-know-who-they-are to who-the-hell-are-they . And i managed to (finally) understand the answers for those lame questions like "Bang! Bang! Who die ?" 、"Black Magic" etc …

Back to school in the morning for Graduation Show briefing for CG students . Damn sleepy !!! And we doh-ray-me ZZZ-ing now and then during the briefing .

Graduation Show is going to be held at Raffles Hotel . Preparation not even started !

* Alert ! *
Busy days and weeks ahead !

TAIWAN TRIP FASTER COME


My just-completed-DIY

Not perfectly done . i still need to improve my skills !
& ごめんね ! No before shot(s) !

This is actually a mini kitchen tray ($2 from Daiso) which i currently use it to place my often use makeup tools . So it wont be scattering around my table .

►► Later gonna go Wenjing's house to work on NTU ADM's assignments . These days and weeks i guess wont be good days for me . Other than settling ADM's applications , i've still got Graduation Show coming up in March !